When your trusty fingernail clippers begin to falter, the task of trimming your nails can become a frustrating chore. Frayed edges, dull blades, and stubborn springs can sabotage an otherwise simple task. But fear not! This comprehensive guide will empower you with the knowledge and techniques to revive your nail clippers and keep them performing at their best.
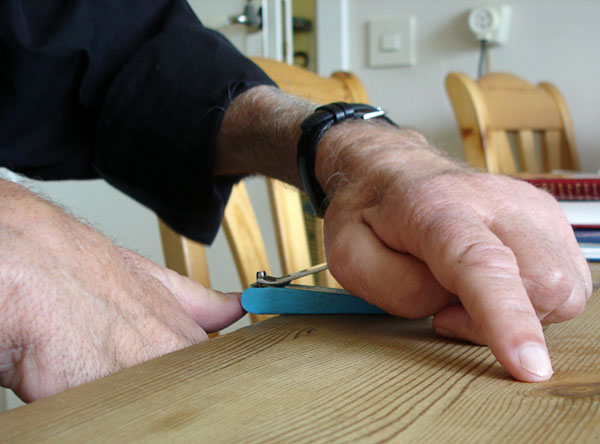
Image: spinalistips.se
Understanding the Anatomy of Nail Clippers: A Foundation for Repair
Before embarking on your repair mission, it’s crucial to understand the anatomy of nail clippers. This handy device consists of two sharp blades, a spring that creates tension between them, and a handle that provides leverage for cutting. When these components work in harmony, a clean and effortless snip is achieved. However, wear and tear can take a toll, leading to various ailments that hinder performance.
Common Ailments of Nail Clippers: Identifying the Problem
Like any frequently used tool, nail clippers are susceptible to various ailments that can affect their functionality. Some of the most common issues include:
-
Dull Blades:
The sharp blades are the heart of nail clippers, and over time, they can become dull. Blunt blades can tear nails instead of cutting them cleanly, causing ragged edges and discomfort.
-
Image: www.nailcarehub.comWeak Spring:
The spring is responsible for creating tension between the blades. When the spring weakens, the blades may not close together tightly enough, resulting in ineffective cutting.
-
Stiff or Rusted Hinges:
The hinges allow the blades to open and close smoothly. However, dirt, debris, or rust can accumulate on the hinges, causing them to become stiff or rusty, impeding the clipper’s movement.
-
Misaligned Blades:
In some cases, the blades may become misaligned, preventing them from making clean contact when cutting. Misaligned blades can lead to tearing and uneven cuts.
Tools of the Trade: Must-Haves for Nail Clipper Repair
Before embarking on the repair process, gather the necessary tools to ensure a successful outcome. This includes:
-
Nail File or Emery Board:
A nail file or emery board will be used to sharpen the blades.
-
Small Screwdriver:
A small screwdriver will be needed to adjust the spring tension or align the blades, if necessary.
-
Isopropyl Alcohol or Rubbing Alcohol:
Isopropyl alcohol or rubbing alcohol will be used to clean and disinfect the clippers.
-
Lubricating Oil:
A drop of lubricating oil will help keep the hinges moving smoothly.
Step-by-Step Nail Clipper Revival: A Journey to Restoration
With the tools at your disposal, let’s delve into the step-by-step process of reviving your nail clippers:
-
Cleaning and Disinfection: Destroying Harmful Germs
Start by cleaning the nail clippers thoroughly. Dip a cotton swab or cloth in isopropyl alcohol or rubbing alcohol and gently wipe down the clippers, removing any dirt, debris, or residue. This step is crucial to prevent the spread of bacteria and ensure hygienic use.
-
Sharpening the Blades: Restoring Keenness
To sharpen the blades, use a nail file or emery board to gently grind the cutting edges. Hold the file or emery board at a 45-degree angle to the blade and move it in a back-and-forth motion. Do not grind excessively, as this can weaken the blades.
-
Adjusting Spring Tension for Optimal Performance
If the spring is weak, it may need to be tightened. Use a small screwdriver to carefully adjust the screw that controls the spring tension. Turn the screw clockwise to tighten the spring and counterclockwise to loosen it. Be mindful not to overtighten the screw, as this can damage the spring.
-
Aligning the Blades for Precision Cutting
Misaligned blades can be adjusted using a small screwdriver. Look for any gaps or unevenness where the blades meet when closed. If necessary, loosen the screw that holds the blades together and carefully shift one blade slightly until they align perfectly.
-
Preserving Smooth Movement with Lubrication
Once you’ve adjusted the blades and spring, apply a drop of lubricating oil to the hinges using a cotton swab. This will keep the hinges moving smoothly and prevent rust buildup.
-
Reassembly for a Revitalized Tool
Once all repairs are complete, reassemble the nail clippers by carefully fitting the blades back together and tightening the screws. Make sure the clippers open and close smoothly without any resistance.
Beyond Repair: When It’s Time for Replacement
If your nail clippers are severely damaged or worn out, it may be time to replace them. A good quality pair of nail clippers should last several years with proper care and maintenance. However, if the blades become too dull to sharpen effectively or the spring has lost its elasticity, it’s best to invest in a new pair.
How To Fix A Fingernail Clipper
Conclusion: Maintaining Pristine Performance and Nail Health
By following these comprehensive repair tips, you can confidently restore your nail clippers to their former glory and maintain their effectiveness for years to come. Remember, regular cleaning and maintenance can significantly extend the life of your nail clippers, preventing issues and ensuring optimal nail care.
